
Visit the whole site at: http://borg20011.tripod.com/borg_link_o_rama.htm
Page 8.
CONTENT:
1- Useful tools 2- Interesting rear wheel alignment tool
3- Front caliper spacer for oversized discs 4- Airbox modification(98-01)
5- Fuel level sensor mod 6- Wheels weights figures and tips
7- Throttle tube modification (quicker turning throttle)
8- How to use a torque wrench with a c-spanner wrench
![]()
1
Taken from the J.C. Whitney catalog and web site.
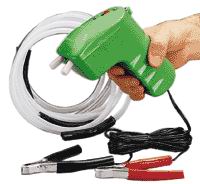
-Oil change pump : Part# 15ZX5180Y Price $22.99
Insert the tube inside the motor via the oil filler hole in the oil pan then pump away. (work on 12v) Pic here
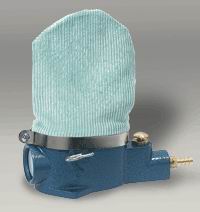
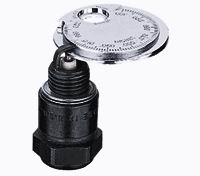
-Spark plug cleaner : Part# 88BB8270W Price $8.99 (page 167)
-Repl. silicone carbide grit : Part# 88BB8276T Price $1.49/bag (page 167)
Thread the spark plug into the machine, press the button and wait...
works on 12v, supplied with alligator clamps to connect on your battery!
-Spark plug cleaner : Part# 81ZX1717P Price $19.99
This one works with 120lbs min. air pressure. Pic here
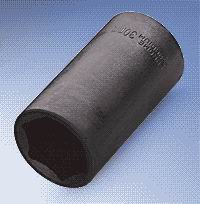
-1/2 drive deep socket in :
30mm Part# 81ZX1087Y Price $4.49
32mm Part# 81ZX1088W Price $5.29
34mm Part# 81ZX1089U Price $6.89
36mm Part# 81ZX1090B Price $7.19
38mm Part# 81ZX5402N Price $8.49
(page 160)
The cheapest I ever saw...for the swingarm nut, rear axle nut and yoke nut. Pic here
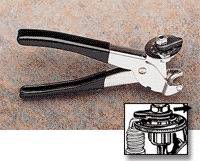
-Pliers style spark plug gaper : Part# 38ZX2461Y Price $4.49 (50% disc)
Easily gap spark plugs with this adjustable tool. Pic here
-Standard gaping tool : Part# 14ZX1332B Price $1.99
We are all used to work with this one. Pic here
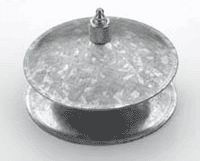
-Grease-packing tool : Part# 15ZX3724N Price $4.98
Excellent to get grease in the neck bearings. Pic here
![]()
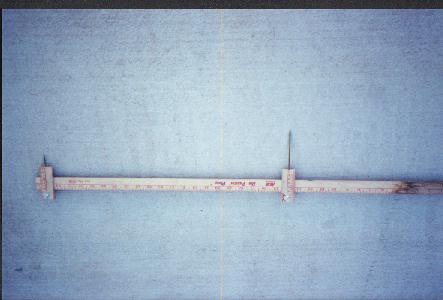
2
Rear wheel alignment tool pic...just copy it!
![]()
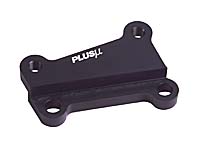
3
Front caliper spacer for oversized discs.
Those are just too expensive to be bought...over $550 Canadians...but have them
machined and use the pic as a blue print.
![]()
4
(Courtesy of http://www.yzf-r1forum.com and Ivan from http://www.ivansperformanceproducts.com )
http://www.yzf-r1forum.com/airbox.html
![]()
5
Fuel level sensor mod
http://daves_garage1.tripod.com/sensormod.html
![]()
6
Wheels weights figures and tips
FRONT WHEELS NO DISCS
Blackstone carbon fiber 4.85 lbs
Dymag carbon fiber 5.6 lbs
Dymag mag center carbon rim 7.8lbs
Hi Point forged aluminum 8.2lbs (unofficial weight)
Marchesini cast mag 7.7 lbs
Marchesini forged mag 7 lbs
Marvic Penta II 7.5 lbs
PVM cast mag 9 lbs
PVM forged aluminum 10 lbs
PVM forged mag 7 lbs
PVM Colorline 5 spoke two piece 14 lbs
OZ forged aluminum 7.75 lbs
Stock RC51 10.5 lbs
REAR WHEEL WITH DISC AND CUSH DRIVE
Blackstone ?
Dymag carbon fiber 13 lbs
Dymag mag center carbon rim 12.8 lbs
Hi Point forged aluminum 16.3 lbs (unofficial weight)
Marchesini cast mag 12.7 lbs
Marchesini forged mag 13 lbs
Marvic Penta II 13.6 lbs
PVM cast mag 14.25 lbs
PVM forged aluminum 17.75 lbs
PVM forged mag 12 lbs
OZ forged aluminum 16.5 lbs
PVM Colorline 5 spoke two piece 6.25" 25.5 lbs
Stock RC51 19 lbs
This is a subject I became abnormally obsessed with on this forum. I've desperately wanted to see what the ACTUAL weight
savings was with aftermarket wheels... so I just thought I'd pass on some exact wheel info VIA A DIGITAL POSTAL SCALE THAT IS
ACCURATE TO 1/10TH OF AN OUNCE!!!
'98-'01 R1 Rear wheel is 11 LBS 13.00 oz. without the sprocket or cush drive.
The cush drive from same years weighs 4 LBS 7.30 oz.
This weight does not include the bolt which hold the brake rotor on nor the
brake rotor itself.
'98-'01 R1 Front wheel is 10 LBS 3.40 oz. without the bolts or brake rotors/carriers.
I was DYING for this info about a month ago so I just thought if somebody wanted
to know then here it is.
Carbon/Mag Dymags will save you 1 LB 13.70 oz. in the front and 1 LB 1.30 oz
in the rear without cush-drive/sprocket and 3 LBS
1.60 oz with a new cush-drive and sprocket. It is EASY to eliminate one pound with the sprocket ALONE. I decided the Dymags are
worth it (just)... I had a mental "cut-off" of 4 LBS... if it was less then that I don't think the cost is justified, but fortunately it's
nearly 5 LBS total. (With the
pound for the sprocket...)
![]()
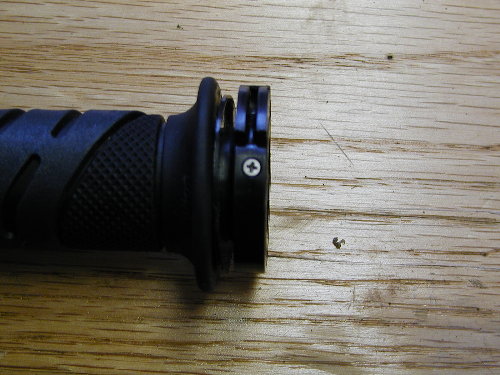
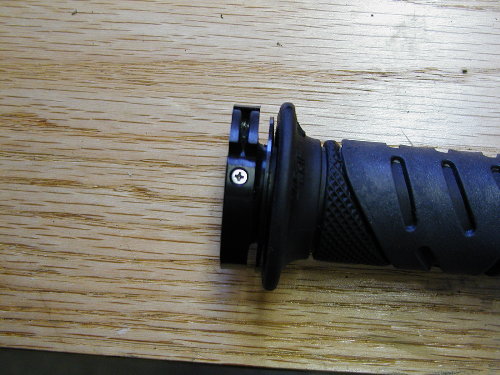
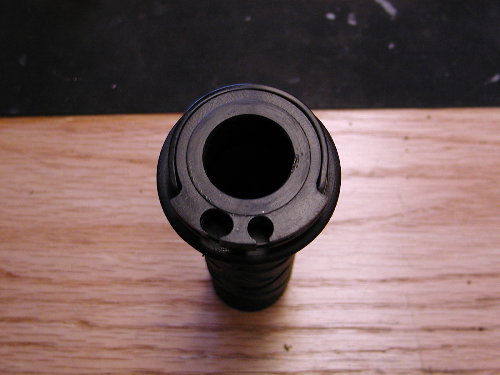
7
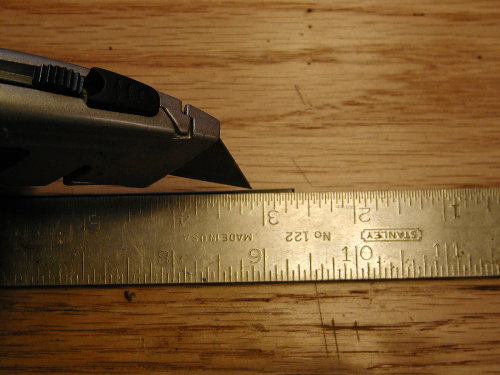
Throttle tube modification by GRH.
Disclaimer: Failure to do this mod the right way is not the responsibility of anyone but yourself.
Attached are pictures and instructions
to modify the stock throttle on a 2001 R1 to turn full throttle in approx 50
degrees.
1. Remove throttle assembly
2. Get .075" thick zip tie (Available at any Home Depot or Ace True Value)
and cut out a middle section to roughly 4" long.
3. Cut 4" section lengthwise removing 1 of the 2 solid sides. Width should
now be approx .27" wide. Debure as necessary. ScotchBrite works well.
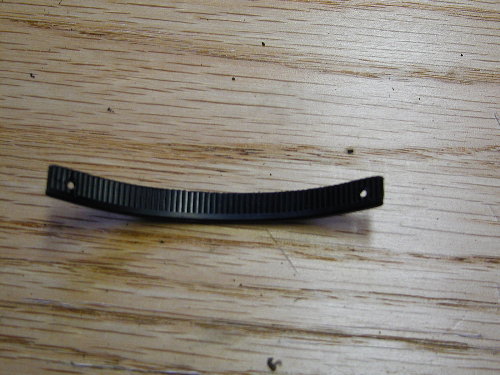
4. Bend zip tie section around throttle area where the cables normally ride
to get final measurement of the section. This measurement should be roughly
3.10". Leave a little extra length and cut the 4" section down to
approx 3.20".
5. Bevel each end as shown in pics and deburr as necessary. Final length of
piece should be approx 3.10" at the end of each bevel and the piece should
be .27" wide.
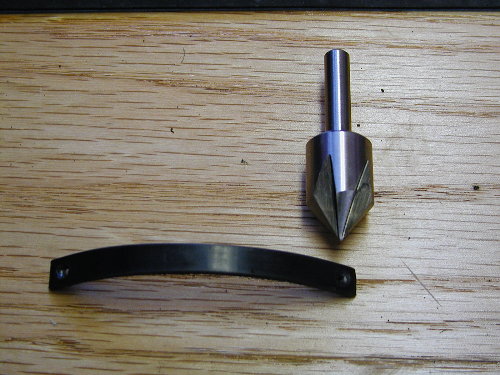
6. Drill .062" hole about .150-.200 from each end of the zip tie.
7. Use 5/8" 82 degree countersink tool to countersink the hole on the solid
side of the zip tie. (very light pressure needed to get right depth)
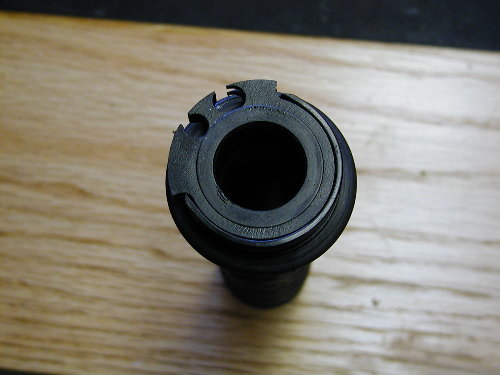
8. Align zip tie on throttle so that each end maintains the same distance from
where the barrel of the cables attach. Mark the hole on one end and drill a
.062" hole approx 6mm deep perpendicular to the throttle.
9. Using a S/S M2 X 4mm countersink screw attach the one end of the zip tie
to the throttle.
10. Roll remaining zip tie tightly around the barrel of the throttle and mark
the second hole.
11. Repeat 8 and 9
12. Reinstall throttle assembly to clip-on
13. Adjust free play in accordance with the manual.
Good Luck
Any questions email me at either
Glennh@sensis.com
or
grhall28@aol.com
Pics of the procedure:
![]()
8
Here is the formula to use a spanner wrench with a torque wrench:
You take a given torque wrench;its torquing measurement is in direct proportion of its build;
We`ll be using a 14" torque wrench for our little formula.
Now say your Kowa spanner`s insertion point for the torque wrench,(square hole in it) is at 6 inches from its tip;add the torque wrench lenght to this and the resulting torquing figures will be all wrong...the dial is now useless,unless you got a friend like me to put you in the right direction
Say you want to torque the bolt at 90ft/pnd:
Formula:
C=D multiplied by (A divided by A+B)
A=lenght of the torque
wrench from handle tip to socket adaptor
B=lenght of the spanner as described earlier
D=initial torque needed for the bolt
C=torque needed with the spanner wrench
A=14 inches
B=6 inches
D=90ft/pnd
C=Unknown
So now we get:
C= 90 multiplied by 14 divided by (14+6)
--->90 x 0.7
C= 63 ft/pnd of torque with the spanner attached to the torque wrench.
You apply the formula to the specific wrenches you own.
Simple.