Visit the whole site at: http://borg20011.tripod.com/borg_link_o_rama.htm

Page 4.
CONTENT:
1-Exhausts gas analyzers 2-Nitrous stuff 3-Ignition box mods 4-Trick radiators
5-Fan override switch (updated) 6-Mods info 7-Battery care 8-Anodize tips
9- Winter storage 10-Carbs balancing 11-Carbs cables tips 12-Brake bleeding tips
13-Wheels weight 14-Ohlins info 15-Scotts damper settings 16-D-rings
17-Undertail installation tips 18-Chain alignment tips 19-carbon bodies tips
20-Stickers application/removal tips 21-Better shifting 22-Coils and TPS specs.
![]()
1
EGA (Exhausts gas analyzers):
Note: I choose to put these retailers links and info sites here, because this is a very special
matter and that may not interest the everyday home mechanic.
On-board EGA sites: 1 2 3 4 5 6 (links #3 and #6 are the most interesting due to space)
EGA that takes into account nitrous, shut it down in case of rich/lean condition:
1 (I got one!)
Note: This last EGA is the best for nitrous applications: 1
Info sites: 1
Build your own: 1 2 3 4 (For you Sam!)
Tuning with an EGA: http://www.turborick.com/
Note: Building you own does not include the probe. Most EGA monitors don't include probes.
Additional note: Keep in mind that could be a good tool for tuning a ram air system; a kind of rolling dyno if you
want!
![]()
2
Nitrous stuff:
Specialized stuff that is! (Serve as examples only)
Pressure monitor: 1
EGA with shut down feature: 1
More to come!
![]()
3
And now that you have all the mods...
All you need now is this:
Unless you can get your hands on a YEC box!
![]()
4
Since you will push some heat...
OR, an option would be to install a Qbcarbon chin-radiator (1liter) for that bit more cooling.
![]()
5
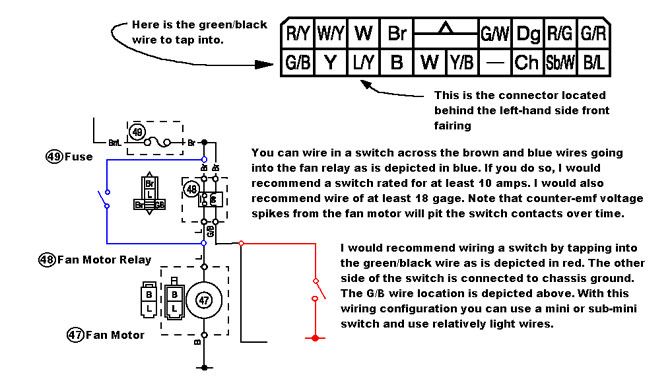
Fan switch connections by SAM FARRIS:
For the radiator fan:
Tap into G/B wire coming out of the fan relay with a new wire.
Connect this new wire to one side of the switch.
Run another new wire from the other side of the switch to ground. Done!...
![]()
Here are two different way to wire
in a manual fan switch. I recommend the 'red' circuit.
If I'm not mistaken, I believe the fan motor relay is located under the seat.
Also, whatever you have connected to the temperature sender, disconnect it.
This is a sensor that varies its resistance with temperature.
It is not meant to be bypassed
with a switch. On the 98~99 R1's there was both
a temperature sender and also a thermo-switch on the radiator.
The thermo-switch was bypassed to make a manual fan switch.
On the 2000, the thermo-switch
is gone.
Sam
For 98-01 diagram: Click here
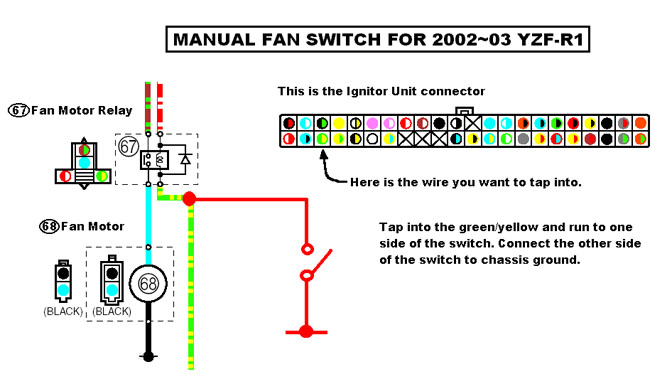
For 02-03 diagram: Click
here
![]()
6
Possible modifications results info:
![]()
7
Battery care information:
Here are a few pointers to tell you if your battery is in good/fair condition:
(Click on red underlined links)
1- A normal battery voltage will be around 12.5 volts without the engine running (ignition off).
2- The normal voltage while cruising at highway speeds should be around 13.8 to 14.2 volts,
depending on accessories running.
3- A charger that reach 13.2 volts (floating charge) at its peak is perfectly acceptable.
If you find the aforementioned figures, your battery/charging system is in good shape!
(If you're looking for an in-board digital voltmeter, check VencoWings site).
Note: Even a heavily sulfated battery can be revived; the big model of Battery Tender,
or a device called "Optimate 3" will get the job done; a best-buy would be the Surecharge
If you have an alarm system installed on your bike, it is recommended
that you plug some kind of battery charger every day on the bike.
(Small model Battery Tender, Surecharge 4,Accumate)
I personally have the Surecharge4 since 1999,working flawlessly; now I`m using the model
12112 BatteryMinder with a desulphation feature.
Info sites on battery care: 1 2 3
Warning:
Discharging a battery from a very hard to start bike then proceeding
to go for a ride thinking that the alternator will charge it back could
be deadly to your battery (beyond recovery); take your time, you can use
an automotive (cars) charger (8amps max) for about 15 minutes (minimum)
to half an hour (best); then proceed with your ride.
The alternator charging cycle kicks-in around 4500rpms, so city-riding
is a no-no after draining the poor little cell; that could be bad for the
charging circuit too!
Sam on charging circuit problems: click here
Sam on battery problems/details: click here
Charging system nominal output: 14V/26A @ 5000rpms.
Voltage regulator (no load): 14.1V to 14.9V
Battery specs: 12V/10AH
![]()
8
Small tips on caring for anodized parts:
Info site: 1
![]()
9
Winter storage:
1-Inflate tires to recommended pressures (not the one you like, the tires manuf. pressures).
2-Remove battery, clean it, plug a charger on it which you can plug and forget till spring.
3-Drain float bowls (carburetors) entirely, or run the bike till it dies.
4-Clean the bike entirely.
5-Generously lube the chain.
6-Change oil and filter.
7-Cover the bike appropriately.
For anal-retentive owners:
In addition to the aforementioned steps, you can do more:
1-Grease the chain (for high-humidity areas).
2-Disassemble carburetors and shoot compressed air in all holes.
3-Clean air filter.
4-Change spark plugs.
5-Put a thick coat of wax, but do not buff till spring.
6-Put the bike on race stands (uniform load on suspensions).
7-Use dielectric grease on all front fairing connectors.
8-When the bike is cold, plug the exhausts outlet (humid areas).
9-Seal the damn thing in a vacuum bag with a dozen of big silica-gel pouches.
Note: You can use the off season to upgrade your bike too, my favorite thing!
Long-time storage:
1-Add a teaspoon of engine oil in each spark plug holes to prevent rings gripping.
2-Put grease on all bearings and pivots areas as well as lubing all the shafts and oiling all cables.
![]()
10
Balancing carburetors:
First, you will need 6mm adaptors to screw in the 4 holes covered by Allen heads screws
found on the cylinder wall below the carburetors bank.
(You will need an auxiliary fuel supply for a more enjoyable work.)
There are 3 devices known to me to do the job:
(Click on blue underlined links)
1-The legendary Carbtune by MotionPro:
1 Dial with vacuum-sliding measuring "sticks", 4 rubber hoses,
you'll need an auxiliary fuel supply for a more enjoyable work.
2-The Twinmax analogue elect. balancer:
1 Analog electronic dial, 2 rubber hoses-one for the referential #1 carburetors, change the second
rubber hose from carb-to-carb to adjust------(I'm getting one!)------best buy.
3-The Synchromate full-elect. balancer:
1 Fully-electronic dial, very easy to operate but expensive, 4 hoses option available separately.
No info sites: brand new product.
Note: There is another way to synchronize carburetors: Use 2 same-size drill bits, one on the #1 (fixed) carburetor, the other on the remaining carburetors; adjust till you can barely remove the bit from the adjusted carburetor...but it's not perfect, it is very easy to get things wrong this way.
![]()
11
Carburetors cables:
They wore out in the most awkward place; right where they go into
the carburetors bodies area. Inspect them from time-to-time.
The throttle slack can be adjusted in 2 places:
1-Right at the throttle housing.
2-On the carburetors.
![]()
12
Brake bleeding:
Click on blue underlined links
Are you ready to curse?
All I can do is giving you links to items and sites that can help you since I'm bad at doing this!
1- Brake bleeding kits sites: 1 2 (recommended)
2- Speedbleeders: 1
3- Bleeding info sites: 1
![]()
13
Wheels weight:
Stock R1 wheels:
Front: 9.6lbs (without tire/discs)
Rear: 12.2lbs (without tire/disc/cush-drive)
Marchesini magnesium:
Front: 6.8lbs (without tire/discs)
Rear: 8.4lbs (without tire/disc/cush-drive)
Dymag carbon:
Front: 4.2lbs (without tire/discs)
Rear: 7.1lbs (WITH cush-drive/disc/sprocket)
Blackstone Tek carbon fibre
Front: 5.50 Rear: 10.38 6.5/8.5
Carrozzeria forged aluminum
Front: 9.42 Rear: 14.02
Dymag Custom Carbon carbon rims cast magnesium spoke/hub
Front: 7.30 Rear: 12.38
JB Power forged magnesium
Front: 6.86 Rear: 11.62
Marchesini forged aluminum Y spoke
Front: 8.82 Rear: 13.80
Marchesini forged magnesium Y spoke
Front: 6.54 Rear: 12.16
Marvic Penta cast magnesium
Front: 7.46 Rear: 12.16
Marvic Piuma cast magnesium(16.5 inch rims)
Front: 7.16 Rear: 11.84
OZ HLO2 forged aluminum
Front: 8.40 Rear:15.54
PVM forged aluminum Y spoke
Front: 7.96 Rear: 13.44
PVM forged Magnesium Y spoke(16.5 inch rims)
Front: 5.60 Rear: 9.76
Stock Suzuki cast aluminum
Front: 10.28 Rear: 16.80
Note: On the front Marchesini, if you go with aftermarket discs
you can get rid of the discs adaptors: they weight 400grams or 0.53lbs(for the pair).
![]()
14
Ohlins info:
Superbike-type rear shock with remote hydraulic preload-adjuster: #46PRCLS
(DeCarbon-type, piggy-back reservoir, all adjustments included ride-height)
2 models:
Soft: OHL-YA805(spring #1093-24)
Std: OHL-YA801(spring#1093-26)
Length adjustability: +11mm/-0mm
Stroke: 65mm
R1-specific road&track forks model#OHL-FG883
43mm
Spring #4745-95
Stroke: 120mm
Note: It is normal for these forks to leak a bit of oil when the bike is stored for
a long time (over 2 months); I know, it is weird, but what can I say!
Sometimes, they will come in their packages brand new with a little leak; do not panic!
![]()
15
Scotts damper settings:
Taken from Sportriders magazine:
1- Low speed damping: 12 clicks from full-stiff.
2- High speed damping: 2 turns out from full stiff (came this way).
3- Sweep: 54 degrees.
![]()
16
D-rings replacement:
Do not waste your time searching;Triumph T595 d-rings are the best and fits right on.
Available in dull aluminum finish or chromed.
Note: I have the chromed on my bike, the rings are as stiff today as they were 2 yrs ago.
![]()
17
Graphicart tail installation advice:
This is also good for other makes, but I suggest that you stuff some
medium-hard sponge pieces in the corners on each sides of the rear lights
to eliminate any vibes/swinging that could lead to cracking or paint rubbing out.
Note: This has nothing to do with craftsmanship on any brands; vibes are the enemy here.
![]()
18
Chain alignment device:
It is a well-known fact that the adjuster marks on the swing arms of most bikes
are way off; in the utilities section, I've added information on how to use a piece
of string to adjust the alignment, but a front stand (the kind that anchor under the forks legs)
is needed; by searching on the net, I've laid my hands on a pretty neat device called
a chain alignment tool.
Available through MPS part# TO08-002 at 18gbp.
Note: the picture in the catalogue is taken with the device mounted on a MX bike;
it should work on any bikes since the device has to be installed on the rear sprocket.
Additional note: It should be fairly easy to make one.
![]()
19
Carbon fiber bodywork warning:
I just wish you guys do not find this bit of information the hard way,
so I thought to warn you before something bad happens:
Carbon fiber eat everything!!!
Explanation: If you want to install carbon fiber parts anywhere on your bikes,
just make sure that the edges of the carbon pieces do not get in direct contact with
any aluminum/metal parts; the vibes made by the bike/road will eat through any metals.
Make sure to protect/shim the carbon parts so they do not get close to metal parts.
Also, one of the drawbacks of carbon fiber panels installation is that sometimes,
when new, the mounting holes do not align exactly; beware, as this will eat through
rubber grommets with time**.
Note: I found out the hard way the first time I've removed my rear hugger to find
out that the damn thing wore in half-way through the swing arm.
**Additional note: Carbon panels will take their final shapes/places after only a while by all the
heat from the motor.
![]()
20
Stickers application and removal info:
Here are some tips for installing stickers in critical places, with perfect alignment the first time trying. In order to do this, you will need the following things:
A-Windex (We will use this product as a guide).
B-Soft rubber scrapper.
C-Rubbing alcohol.
Here are the steps for success:
1-Clean the surface on which you want to apply the stickers with rubbing alcohol.
2-Clean your hands of all dirt/greasy agents.
3-Carefully peel-off the backing of the stickers without touching the glued parts with your fingers.
4-Use fast-evaporating agent such as Windex, apply liberally on bodywork.
5-Put the sticker on the Windex, slide in place.
6-Remove the excess of Windex by applying smooth strokes of rubber scrapper.
Note: Be careful to not rip/stretch the sticker by applying to hard a force on the scrapper.
Success!!!
For removal, heat the stickers with a hair dryer; use lighter fluid or WD-40 to remove the remaining goo.
![]()
21
Bike is hard to shift in gear?
Well, make sure the chain is not to tight and the gear-shift linkage
Heim-joints are not loose.
Besides that piece of advice, consult a reputable mechanic.
It's a well-known fact that a good set of rear sets make the bike shift better too;
In case you don't have the $$$ for a set, jack up plates kits are available on
the market which will change the position/angle of your boot, thus reproducing
the effect of rear sets.
Note: If all the above don't work, you probably have a bent/worn-out shift fork somewhere in there;
meaning that you have been doing wheelies you devils...lol
Also, make sure that your clutch cable slack is properly adjusted; there are 2 places
where to adjust it:
1-At the small thumb-wheel at the lever.
2-At the clutch actuation shaft on the motor.
![]()
22
Some more small info.
Coils and TPS specs.
TPS resistance: 4 to 6 ohms.
Primary coil resistance: 1.87 to 2.53 ohms.
Secondary coil resistance: 12 to 18 ohms.
How to adjust the TPS...its on a FZ1 though, but its the same.